
Add to Cart
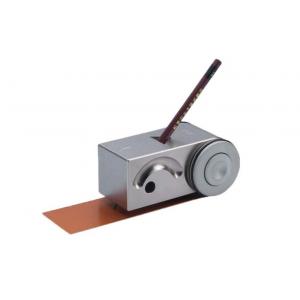
Pencil hardness tester is used to test coatings for their hardness and resistance to scratches and wear. The test method allows the use of pencils which have a known hardness grade to be moved over the surface to be tested at a fixed angle and pressure.
The pencil lead, prepared beforehand by using the special pencil
sharpener and rubbing it on fine abrasive paper (400 grade), is
maintained at an angle of 45° and pushed with uniform pressure on
to the sample, leaving either a superficial trace or causing
destruction down to the substrate.
The Pencil Hardness Tester is supplied complete with stand and a
series of 14 pencils, ranging from 6B to 6H hardness values.
Measuring Method
3.1 Before You Start
The test should be carried out at 23°C ± 2°C (73.5°F ± 3.5°F) and
50% ± 5% relative humidity, unless otherwise agreed.
3.2 Prepare The Pencils
1) Use the special pencil sharpeners supplied:
Use sharpener T99923040-1 for pencils 6H, 5H, 4H, 3H, 2H, H, F, HB,
B and 2B. Use sharpener T99923040-2 for pencils 3B, 4B, 5B and 6B.
Sharpen until approximately 5 mm to 6 mm (¼") of lead, is exposed
taking care to leave the exposed lead unmarked.
2) Place a sheet of abrasive paper (400 grade) on a flat, hard
surface.
3) Hold the pencil at 90° to the abrasive paper and rub the lead
until a flat, smooth and circular cross-section is achieved. Ensure
that the edge is free of chips or nicks.
3.3 Select a Pencil
When testing to BS 3900 E19 and ISO 15184, always start with the
softest pencil (6B) and then work up the hardness scale.
When testing to ASTM D 3363, always start with the hardest pencil
(6H) and then work down the hardness scale.
3.4 Push The Pencil
Place the test panel on a level, firm, horizontal surface.
Hold a pencil firmly with the lead at an angle of 45° to the
surface of the test panel and the point facing away from you.
Push the pencil away from you approximately 6 mm (¼") applying
sufficient downward pressure to cut or scratch the coating or to
crumble the edge of the lead.
3.5 Inspect
Check the test surface by either close visual inspection, by feel
using a fingernail or, if agreed, using a microscope with between
x6 and x10 magnification.
For ASTM D 3363 identify the end point of the test as follows:
• Gouge hardness; the hardest pencil that leaves the coating uncut
over a stroke length of at least 3 mm.
• Scratch hardness; the hardest pencil that will not rupture or
scratch the coating. For ISO 15184 note one or both of the
following defects:
• Plastic deformation; a permanent indentation in the paint surface
without cohesive fracture.
• Cohesive fracture; the presence of a visible scratch or rupture
in the surface of the paint film, material having been removed from
the paint film.
3.6 Repeat The Test
The test procedure (2.3 to 2.5) should be repeated 12 mm (½”) away
from the first test using the next pencil. If the two test results
differ by more than one unit of pencil hardness, discard the
results and repeat the test.
3.7 Test Report
The following information should be contained in any report on the
results of the Pencil Test:
• The type of defect resulting from the test.
Note: In some cases the two test end points will be the same.
• The make and manufacture of the pencils used.
• Any deviation from standard conditions including the temperature
and humidity conditions of the test and the roughness of the
coating surface.
• The magnification of the microscope, if one is used.
Note:
Hardness tester with tip load of 500g weighs 2kg before packing. Plus foam cardboard and other packaging should be 2.5kg weight.
Hardness tester with tip load of 750g weighs 2.4kg before packing.
Plus foam cardboard and other packaging should be 3kg weight.
Hardness tester with tip load of 1000g weighs 2.5kg before packing.
Plus foam cardboard and other packaging should be 3kg weight.


