
Add to Cart
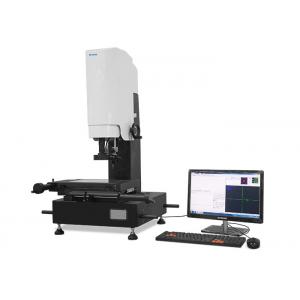
2D Coordinate Image Optical Measuring Equipment Programmable
Programmable 2D Coordinate Optical Precision Image Test Machine is a precise and effective non-contact optical measuring instrument. It is composed of a series of accessories, such as color CCD Camera & adapter, zoom lens capture card, linear scales, high precision worktable, electronic motor, PC and monitor.
The Main Technical Parameters:
| Model | TT-U801 2D Coordinate Optical Precision Image Test Machine | |
| Glass table size | 320×280mm | |
| Travel: X,Y | 400×300mm | |
| Net Weight | 240 kg | |
| Dimension | 750×600×920mm | |
| Travel: Z : 150mm | Work distance: 95mm | |
| Video system | Camera: Color 1/3``CCD camera | |
| Optical Magnification:0.7~4.5X | ||
| Digital magnification:30~230X | ||
| Object view-field:8.1~1.3mm | ||
| Contour and surface illumination: Ring LED and brightness can be setup | ||
| Power | 180V(AC)-260V(AC) 50Hz | |
| Software | Quick Measuring 2.0 | |
Features of Programmable 2D Coordinate Optical Precision Image Test Machine:
1 > Creative modern-shape-design;
2 > Fashionable auto-painting-craftwork ;
3 > Steady granite base;
4 > Stable imported V-shape guide;
5 > Precise metal and glass worktable;
6 > High-speed 3-axis CNC driven motor;
7 > Adjustable USB 40-division ring LED illumination;
8 > Advanced Pomeas 0.7~4.5X Zoom lens;
9 > Wonderful SONY 1/2`` Color CCD camera;
10> Powerful 2.5D measuring software QuickMeasuring 4.1 version.
the hardware:
1, with marble base, column, precision machinery countertops, good
stability, structural rigidity
2, three-stage structure, enhance the mechanical stability, ensure
X, Y horizontal movement precision;
3, table X, Y to the vertical high assurance coordinate measurement
accuracy, even if the work does not straighten can also achieve
high measurement accuracy;
4, single-axis precision linear compensation up to 3 + L / 200,
non-linear compensation up to 3 + L / 250;
5, LED light source and the surface contours of light, meet the
lighting requirements of different surfaces
6, integrated machine stand, make the operation more convenient,
ergonomic;
7, to provide 12 months long warranty and lifetime maintenance,
once selected no worries.
the software:
1, the software has a similar EXCEL reporting. Measurement data can
be seamlessly connected with the EXCEL data
2. The report data can be directly SPC data analysis
3, automatic output tolerances and are able to colors, sounds,
logos alarm, most especially timely for product tracking size.
4, in the image measurement industry was first introduced in the
sub-pixel measurement functions, measurement are no professional
requirements. Relative to peer products, at least 3/5 of angels to
save measurement time, greatly enhance the efficiency measure.
5, do primitive reproduction, translation, rotation, mirroring, the
line segment extending, shearing, two wire arc tangent. Tangent
point circle.
6, do the vertical, horizontal, diameter, radius, angle dimension;
Measurable distance between two points, the point-to-line distance
from the line to the circle, two round distance, center distance
line;
7, do shape difference measurements, such as: parallelism,
roundness, straightness and so on;
8, you can measure a variety of complex graphics including curves.
9, a powerful shot map capabilities that enable virtual
measurement.
Programmable 2D Coordinate Optical Precision Image Test Machine view:
