ABS Tattoo Power Unit , Tattoo Machine Power Supply Kit With Foot Switch And Cord
Brand Name:Tattoo Power Supply
Certification:CE
Model Number:P114
Minimum Order Quantity:5pcs
Delivery Time:3-5 work days
Payment Terms:T/T, Western Union, MoneyGram, L/C, PP
Contact Now
Add to Cart
Active Member
Location:
Dongguan Guangdong China
Address:
No. 33, DF rd., WanJiang, Dongguan, Guangdong, China
Supplier`s last login times:
within 48 hours
Product Details
Company Profile
Product Details
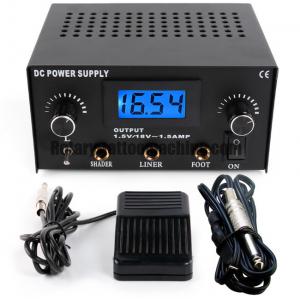
Professional Tattoo Power Supply With Foot Switch And Tattoo Power
Supply Cord
Specification
How to use
1. Insert the one side of AC power line into the back power hole of
this device, insert the plug of power line into the socket.
2. Plug-in the foot switch.
3. Connect the tattoo machines with the this power supply, liner
hole is for lining machine, shader jack is for shading machine.
4. After connecting the power, pull down the left bottom metal knob
to “S”, the shading machine starts to work, twisting the left knob
of display to adjust the output voltage. Pull up the metal knob to
“L”, the lining machine starts to work, twisting the right knob of
display to adjust the output voltage. You can get any needed
voltage as you want through controlling the knob beside the LCD.
Attention:
- Please use it at the rated voltage and current, if any abnormal things occur, please check the power line and output lines.
- The body of power supply avoids heavy load during use, can’t be dropped, if any deformation happens, stop using it.
- It has high voltage risk when powering on, don’t dismantle it by yourself.
| Name | Tattoo power supply | Material of shell | ABS |
| Input current | 0.5A | Output volts | 1.5V-18V |
| Length | 140mm | Output current | 1.5A |
| Width | 110mm | Height | 75mm |
Pictures
Shipping method
- Door to door(by international express)--including DHL/UPS/FEDEX/EMS etc, generally 3-5 days arrived.
- Door to airport(by air)--normally 2-5 days arrived, but customer need to go to airport for customs clearance and pick up, suitable for large amount of cargo in a hurry to be delivered.
- Door to seaport(by boat)--about 10-50 days arrived, customer have to pick up goods and proceed customs clearance at destination harbor, suitable for unhurriedly bulky order to be shipped.
How to place order
- Send us inquiry for the tattoo products and quantity you want to purchase.
- We will send you competitive quotation based on your amount.
- After being confirmed by you, we will make proforma invoice for you.
- Choose one payment method from our options to finish payment.
- We will arrange shipping asap once your product is available in our stock.
- Give you tracking number or bill of lading to trace the goods.
F&Q
- Q: Can we buy a sample to test before placing bulk order?
- A: Sure, sample is available prior to mass order.
- Q: What’s your MOQ?
- A: Our MOQ is not high, but for different products are not same, welcome to advise us the items you want, then we check for you.
- Q: Can you offer competitive price?
- A: Of course, the much more quantity you buy, the better price you can enjoy.
- Q: What’s the lead time?
- A: Generally lead time is 2-7 days, we will inform you in advance if stock is not enough.
- Q: What’s the payment methods you can offer?
- A: Our general payment method is TT, Western Union, MoneyGram, PP, L/C
- Q: We want to customize our own packaging box and print own logo, is OEM OK?
- A: We can accept OEM order if quantity reaches our standard.
- Q: What countries are your products exported to?
- A: North American and South American market, European countries, Australia and Asian countries.


ABS Tattoo Power Unit , Tattoo Machine Power Supply Kit With Foot Switch And Cord
Inquiry Cart
0