
Add to Cart
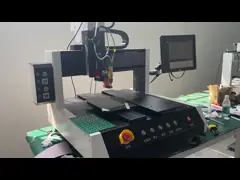
3HP Vacuum Cleaning System Printed Circuit Board Router For MCPCB
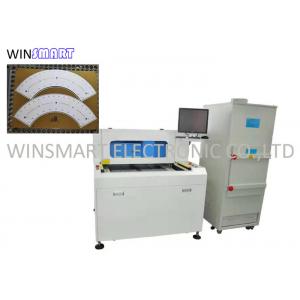
Printed Circuit Board Router Description:
1. Improve product quality, reduce cutting stress and prevent chip
damage during cutting.
2. A variety of cutting paths can cut straight lines, arcs and
circle, greatly reducing the restrictions on the PCB design.
3. The operation of PCB cutter routing machine is simple and easy,
and the model can be switched (Switching Model: program switching,
fixture switching)
4. The automatic PCB router machine has high cutting precision. The
accuracy can reach ± 0.01mm to meet various cutting requirements.
Printed Circuit Board Router Characteristics:
1. Improve product quality and reduce scrap rate.
2. It is equipped with high pixel color CCD magnifying glass,
auxiliary program teaching and editing functions, with higher
accuracy, and the simulation can be modified in one step.
Industrial LCD has clear image and large viewing angle.
3. Equipped with handheld teaching pendant. Program editing can be
done manually or imported using G code. It has the functions of
importing, exporting, copying board array, editing and modifying,
so as to simplify the time and accuracy of program making.
4. Fully closed, transparent safety door, safe operation and easy
observation.
5. Equipped with powerful dust collection filter and dust
collector. The up-down suction method is optional and can solve the
chip problem cleanly.
Printed Circuit Board Router Features:
1. This PCB router has two-slide tables to do continuous cutting.
2. Lower stress to ensure smooth cutting edge.
3. Imported motor and spindle is used for noise free purpose.
4. Optional top and bottom vacuum cleaning sytem is available.
Printed Circuit Board Router Specifications:
| Dimensions(W*D*H) | 1150mm*1250mm*1325mm |
| Weight | 750KG |
| Height offset | 60~110mm |
| Motor type | JiaBao series |
| Positioning repeatability | 0.001mm |
| Axis working area(max) | 870mm*450mm*50mm |
| PCB fixation | standard,specialization |
| PCB loading/unloading | manual |
| PCB size (max) | 350*400mm |
| PCB thick (max) | 5mm |
| Rigidity fixturing | Customized make fixture |
| Fixturing fixation | machinery |
| Power | 40W |
| Spindle | 60000rpm/min |
| Protect | self/wind cooling |
| Change cutter | Specialization |
| Cutting speed(max.) | 100mm/s |
| Driving speed(max.) | 3000mm/s |
| Precision of cutting | 0.01mm |
| Vacuum power | 3.5KW AC 380V |
| Vacuum | plumb |
| Power | 2.0KW AC380V |
| Air supply | 4-6KG/cm2 |
| Program edit | Inline |
| Function edit | Line,arc,circula,U-curve |
| Program storage | HDD |
| Vision system | SONE colour CCD |
| milling cutter offset | AUTO |
| Vacuum setup | AUTO |
| Iindicator | Iindicator Machine state |
| tool check | Automatic detection tool life, the use of time testing |
| Motor protect | Have overheating, overload, low voltage protection function |
| motor over loading check | Have Overload, the line is normal, low voltage protection function |
| Tool usable time | Automatic detection tool life, |
| Data statistic | Separate board model, separating count, diverse counting methods |
| Error record | Software automatically records all alarms memory of machines |
| Axis precision | 0.001mm |
| Cutting precision | 0.1mm |
| Working area protect | With four sealed protection |
| Door sensor | Front and rear safety door micro-switch sensor (optional) |
Printed Circuit Board Router Operation Process:
1. Check whether the equipment is powered on normally and confirm
that the equipment has been reset and waiting for operation.
2. The operator shall determine the direction and positive and
negative directions of the PCB board, place the PCB board on the
special fixture, press it gently with the palm of his hand, confirm
that the PCB board has been placed, put down the gland and ensure
that the PCB board has been tightly covered.
3. Use the visual camera to adjust the programmed cutting path and
confirm to save.
4. Press the start button, the PCB router starts to work, the
vacuum cleaner, spindle, electrostatic removal, etc. will also
start automatically, and the milling cutter divides boards
according to the programmed cutting path.
5. Complete the whole assembly and PCB depaneling, the workbench
will exit automatically, open the gland, make sure that the
separated PCB board is not damaged, manually remove the product,
replace the new PCB board, cover the gland, and click the start
button to separate.
6. Repeat step 4.5 until all products are finished.